
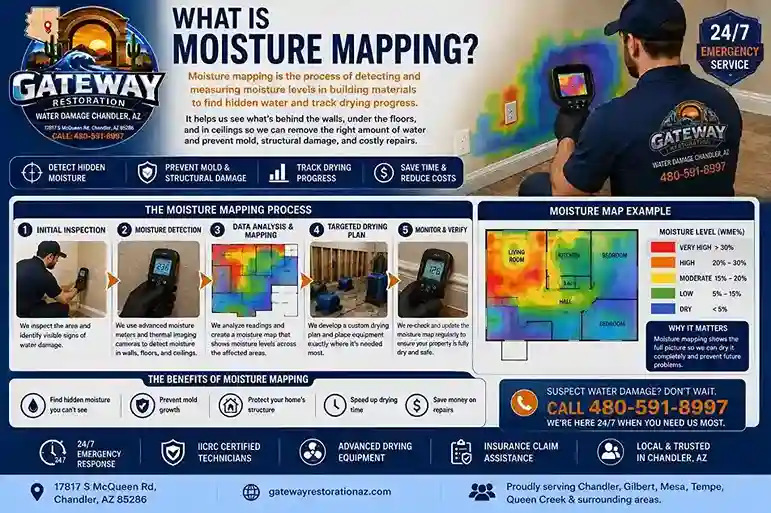
Moisture mapping is the process of locating, measuring, documenting, and tracking hidden moisture inside building materials after a water damage event. It allows restoration professionals to identify affected areas that cannot be seen with the naked eye — and it is one of the most important steps in any professional water damage restoration project. Without it, the moisture that drives mold growth, structural decay, and long-term property damage remains invisible until the damage is already done.
If your home has experienced water damage from a burst pipe, slab leak, appliance failure, or monsoon storm, do not wait. Hidden moisture begins causing damage immediately. Call Gateway Restoration at (480) 591-8997 for immediate moisture mapping, thermal imaging, and structural drying services throughout Chandler and the East Valley.
What Moisture Mapping Actually Means
The term "moisture mapping" can sound technical, but the concept is straightforward: after a water damage event, a restoration professional systematically scans, tests, and documents every area of the home or building that has been affected by moisture — including the areas that look completely dry on the surface.
Most homeowners assume that if they cannot see water, the problem is resolved. That assumption is one of the most costly mistakes a property owner can make after a water event. Water is not cooperative. It does not stay where it lands. It travels.
Consider what happens when a pipe bursts inside a wall. The water that sprays from the break wets the interior of the wall cavity. From there, it wicks into the drywall paper facing, migrates downward through gravity, and is absorbed into the flooring and subfloor beneath. Simultaneously, the pressure of the leak pushes water outward through any available pathway — nail holes, gaps in framing, seams between flooring panels. Within hours, moisture that started inside a single wall cavity can be present under flooring 15 feet away, inside insulation two rooms over, and beneath baseboards on the opposite side of the structure.
Moisture mapping identifies all of this. It categorizes moisture by type and severity:
- Surface moisture — visible wetness on exposed surfaces, the easiest to identify and address
- Trapped moisture — moisture locked inside wall cavities, subfloor assemblies, or insulation batt layers where air circulation cannot reach it
- Secondary water migration — moisture that has traveled beyond the initial impact zone through absorption, gravity, or capillary action
- Moisture pathways — the routes water has taken through the structure, which must be traced to confirm that all migration has been identified
A professional moisture map documents all of these conditions in a floor plan diagram with specific readings logged at each measurement point, creating a baseline that guides the entire restoration process.
Why Hidden Water Damage Is So Dangerous
Hidden moisture does not sit quietly. It is constantly reacting with the building materials around it, and in Arizona's warm indoor temperatures, it moves fast. The dangers of undetected hidden moisture include:
- Mold growth — mold can begin colonizing damp materials within 24 to 48 hours in warm conditions. Mold grows where moisture is, not necessarily where the water damage is visible. A wall cavity with trapped moisture at 70% relative humidity is an ideal mold environment even if the visible surface of the wall looks completely normal.
- Structural damage — framing lumber that stays wet for more than a few days begins to lose structural integrity. Extended moisture exposure causes wood to swell, warp, and eventually rot, compromising the structural members that support floors, walls, and rooflines.
- Drywall deterioration — drywall is essentially compressed paper and gypsum. Once wet, it loses strength rapidly and becomes an ideal food source for mold. Drywall that appears undamaged on its surface can be severely compromised inside.
- Flooring failure — hardwood flooring absorbs moisture from below through the subfloor, causing it to cup, buckle, and separate from the subfloor. Laminate flooring swells at the seams. Tile grout lines hold moisture that migrates into the mortar bed beneath. None of this is visible until the damage is severe.
- Odor problems — musty odors are one of the first signs that hidden moisture has reached a level where microbial activity is occurring. By the time you smell it, mold growth has typically been underway for days or weeks.
- Indoor air quality concerns — mold spores released from hidden colonies circulate through the HVAC system and throughout the home, creating respiratory health risks for occupants, particularly those with asthma or allergies.
In Chandler's warm interior temperatures, mold can begin developing on wet materials within 24 to 48 hours of water exposure. Hidden moisture that goes undetected creates exactly the warm, dark, damp conditions mold needs to thrive. Moisture mapping is the only reliable way to find all of it before that window closes.
How Water Moves Through a Home After a Leak
To understand why moisture mapping is necessary, it helps to understand how water actually behaves inside a structure. Water is not passive — it moves through buildings according to predictable physical principles, often traveling far from the source before settling into building materials.
- Gravity — water moves downward through any available opening. A ceiling leak from a roof or upstairs plumbing saturates the ceiling assembly, follows the ceiling joists, and drips down into wall cavities, where it continues downward into the floor assembly below.
- Capillary action — porous materials like drywall, concrete, brick, and wood actively draw moisture upward and laterally through tiny pores and channels in the material structure. A wet concrete slab can wick moisture several inches upward into flooring adhesive, flooring panels, and baseboards without any additional water source.
- Vapor movement — wet materials release water vapor into surrounding air. In enclosed spaces like wall cavities and subfloor assemblies, that vapor condenses on cooler surfaces, creating secondary moisture problems in areas that were never directly contacted by water.
- Material absorption — different materials absorb moisture at dramatically different rates. Insulation batt can hold many times its weight in water. Carpet padding acts like a sponge, absorbing massive moisture volumes while the carpet surface above appears only slightly damp. Drywall paper absorbs moisture along its entire face while the gypsum core inside remains structurally intact, making the damage invisible to the touch.
A monsoon storm that pushes two inches of water under a garage door will not stay in the garage. The water wicks under the drywall face, saturates the bottom foot of framing, migrates into the adjacent interior rooms under the door threshold, and begins saturating the flooring system — often reaching 8 to 10 feet from the source point before the average homeowner has even begun mopping the garage floor.
The Moisture Mapping Process Step-by-Step
Professional moisture mapping follows a structured process that ensures every area of hidden moisture is identified, documented, and addressed. Here is what occurs at each stage of a residential moisture mapping project in Chandler.
Initial Inspection
The technician walks the entire property, identifying the reported water source, assessing visible damage, and establishing the likely extent of moisture migration based on the water category, quantity, and time elapsed since the event. This establishes the scope for the full moisture mapping inspection that follows.
Source Identification
Before mapping moisture, the source must be confirmed as stopped. Active leaks are identified and the property owner is directed to shut off supply lines or contact a plumber. In monsoon situations, the path of water entry is identified and documented. Until the source is stopped, moisture mapping cannot establish a stable baseline.
Thermal Imaging Scan
A thermal imaging camera is used to scan all walls, ceilings, and floors in and around the affected area. Wet materials have different thermal signatures than dry materials, appearing as distinct temperature anomalies on the thermal image. This scan quickly identifies areas of potential hidden moisture across large surfaces without any invasive testing.
Moisture Meter Testing
Every area flagged by the thermal scan is confirmed and quantified using moisture meters. Both pin-type meters (which insert into the material) and pinless meters (which measure below the surface without penetration) are used depending on the material type. Readings are recorded at standardized intervals to create a measurable moisture profile across all affected materials.
Hygrometer Readings
Ambient conditions in each affected room are measured with a hygrometer — temperature, relative humidity, and dew point. These readings determine the drying potential of the environment and are used to calculate the equipment capacity needed to achieve the required drying conditions according to IICRC standards.
Moisture Mapping Documentation
All readings are compiled into a moisture map — a floor plan diagram with specific moisture values recorded at each measurement point, color-coded by severity, and dated for baseline reference. This document becomes the foundation of the drying plan and the insurance documentation package.
Drying Plan Development
Using the moisture map readings, the technician calculates the type, quantity, and placement of drying equipment needed to address all identified moisture. IICRC S500 standards guide equipment selection based on the volume of affected material, the material types involved, the water category, and the ambient drying conditions.
Daily Monitoring
The technician returns daily to re-test all affected areas with moisture meters and hygrometers, logging the readings in a drying log. This data shows whether the drying equipment is performing as expected and identifies any areas that need additional attention. Daily monitoring also creates the documentation that insurance adjusters need to confirm the drying process was properly managed.
Final Verification
When all moisture meter readings have returned to the established dry standard for each material type, a final moisture mapping survey is performed. Thermal imaging confirms no residual anomalies. The final moisture map and complete drying log are compiled into the restoration documentation package and provided to the property owner and their insurance company.
The Tools Used During Moisture Mapping
Professional moisture mapping relies on a set of specialized instruments, each designed to measure a specific aspect of the moisture condition inside a building. Understanding these tools helps property owners understand what their restoration technician is doing and why each step matters.
Thermal Imaging Cameras
A thermal imaging camera detects infrared radiation emitted by surfaces and converts that data into a color-coded image showing temperature distribution across a surface. In water damage restoration, this is valuable because wet materials and dry materials behave differently when subjected to evaporative cooling or conducted heat — wet areas are typically cooler than surrounding dry areas, and that temperature difference shows up clearly on the thermal image as a distinct color anomaly.
It is critical to understand what thermal cameras do and do not detect. A thermal camera does not see through walls. It does not directly detect water. It detects temperature differences at the surface of the material being scanned. A trained technician interprets those temperature patterns to identify areas that are likely to contain hidden moisture — and then confirms that interpretation with a moisture meter. Thermal imaging without confirmation testing is screening, not diagnosis.
For a thermal scan to be useful, there must be a sufficient temperature differential between wet and dry materials. Scanning during the middle of a hot Arizona afternoon — when surface temperatures are equalized by solar radiation — can produce poor results. Experienced technicians time their thermal scans appropriately and interpret results in the context of the specific environmental conditions present.
Moisture Meters
Moisture meters directly measure moisture content in building materials, providing the numerical readings that moisture maps are built from. Two primary types are used in professional restoration:
- Pin meters use two metallic probes inserted into the material surface. An electrical current is passed between the pins, and the resistance of the material to that current is measured. Water conducts electricity; dry materials resist it. The resistance reading is converted to a moisture content percentage for that material type.
- Pinless meters use an electromagnetic field that penetrates below the material surface to detect moisture without physical penetration. They are used for screening and for testing delicate materials like finished hardwood flooring where pin holes would cause cosmetic damage. Pinless meters provide directional readings rather than exact percentages and are used in conjunction with pin meters for confirmed readings.
- Deep wall probe systems use extended probes inserted through a small drilled hole to test moisture deep inside wall cavities, at the base of framing members, or at the subfloor level below finished flooring. These are used when surface readings suggest hidden moisture at depth and confirmation is needed without full demolition.
Hygrometers
A hygrometer measures the moisture content of the air rather than the building materials. The critical readings are:
- Relative humidity (RH) — the percentage of moisture in the air relative to the maximum moisture the air can hold at that temperature. Effective drying requires maintaining ambient RH below 50% inside the affected space.
- Temperature — warmer air holds more moisture and supports faster evaporation from wet materials. Most residential structural drying occurs most efficiently at temperatures between 70 and 90 degrees Fahrenheit.
- Dew point — the temperature at which water vapor in the air begins to condense as liquid. Dew point readings help predict secondary moisture problems and guide decisions about when to close or open the drying environment to exterior air.
Data Logging Equipment
Continuous data loggers are small sensors placed inside the drying environment that record temperature and humidity readings at regular intervals throughout the drying process. Unlike manual readings taken during technician visits, data loggers capture conditions 24 hours a day, providing a complete drying record that shows not just the conditions at time-of-visit but the entire environmental history of the drying process. This continuous log is valuable for insurance documentation and for diagnosing problems if drying stalls unexpectedly.
Thermal Imaging Camera
Scans large surface areas quickly for temperature anomalies that suggest hidden moisture. Non-invasive. Used for initial screening before meter confirmation.
Moisture Meters
Pin and pinless meters that directly measure moisture content in specific materials. Provides the numerical readings that moisture maps are built from.
Hygrometers
Measure ambient temperature, relative humidity, and dew point inside the drying environment. Guides equipment selection and verifies drying conditions.
Data Loggers
Continuous monitoring sensors that record environmental conditions 24/7. Provides a complete drying history for insurance documentation and drying verification.
Thermal Imaging vs Moisture Meters: What Is the Difference?
Homeowners frequently ask whether thermal imaging or moisture meters are more accurate. The answer is that they measure different things and are designed to be used together. Neither tool alone provides a complete picture of moisture conditions inside a structure.
| Factor | Thermal Imaging Camera | Moisture Meter |
|---|---|---|
| What it detects | Surface temperature differences | Actual moisture content in materials |
| Speed | Fast — scans entire walls in seconds | Slower — tests one point at a time |
| Invasiveness | Completely non-invasive | Pin meters require surface penetration |
| Accuracy | Screening tool — indicates likely moisture zones | Diagnostic tool — quantifies moisture precisely |
| Coverage | Large area in a single scan | Point-specific readings |
| Best used for | Initial survey and post-drying verification | Confirming and quantifying thermal findings |
| Limitations | Requires temperature differential; does not measure moisture directly | Slow for large areas; pin holes in finished surfaces |
| Role in process | Find it | Confirm it and measure it |
Experienced restoration professionals use thermal imaging to rapidly identify suspect zones across an entire structure, then apply moisture meters to confirm those zones and establish precise moisture content readings. Together, they provide both the speed needed for efficient large-area scanning and the precision needed for accurate documentation.
Common Places Moisture Mapping Finds Hidden Water
In 15 years of responding to water damage across Chandler and the East Valley, the Gateway Restoration team has consistently found hidden moisture in the same locations — places that appear dry on the surface but conceal significant moisture problems inside.
- Behind drywall — drywall paper wicks moisture laterally and vertically from the point of contact. A wet patch the size of a dinner plate on the surface can indicate drywall saturation covering 10 to 20 square feet of the wall assembly.
- Under flooring — water from a slab leak, appliance overflow, or flood event migrates under flooring panels and into the adhesive and subfloor assembly below. The flooring surface may appear dry while the subfloor is at 80% or higher moisture content.
- Beneath cabinets — kitchen and bathroom cabinet bases sit directly on the flooring, and the enclosed space beneath traps moisture effectively. A dishwasher leak or under-sink plumbing failure can saturate the cabinet base and flooring beneath while the visible interior of the cabinet appears clean and dry.
- Behind tile showers — failed tile grout or caulk allows water to migrate behind tile into the cement board and framing behind. This moisture is completely invisible from the tile surface and frequently goes undetected for years, driving significant mold growth in the wall cavity.
- Inside insulation — fiberglass and cellulose insulation can hold enormous moisture volumes while appearing intact. Wet insulation provides no thermal benefit, loses its structural loft, and creates a sustained moisture reservoir against the building materials it contacts.
- Around windows — window frame failures, failed caulk seals, and condensation on single-pane glass in high-humidity conditions all allow moisture to enter the wall assembly around window frames, saturating framing and insulation before any visible staining appears.
- In attics — roof leaks often enter the attic and spread along roof decking and rafters before dripping into ceiling assemblies below. Attic moisture can saturate insulation and decking extensively before the first ceiling stain appears in living areas.
- In crawlspaces — plumbing failures, ground moisture intrusion, and condensation from HVAC equipment all create moisture problems in crawlspaces that saturate floor joists, subfloor sheathing, and insulation over time.
Why Chandler Homes Need Moisture Mapping
Chandler, Arizona presents a unique combination of construction characteristics, soil conditions, and weather patterns that create specific moisture concealment challenges not typically found in other parts of the country. Homeowners and restoration professionals working in Chandler need to understand these local factors to conduct effective moisture mapping.
Slab-on-grade construction is nearly universal in Chandler. Unlike homes with basements or crawlspaces where plumbing is accessible below the floor level, Chandler homes typically have all plumbing encased in a concrete slab. When a slab leak occurs, water percolates up through the slab and into the flooring above — with no visible leak point and no accessible pipe to inspect. The only reliable method for identifying the extent of moisture migration from a slab leak is systematic moisture mapping of all flooring and adjacent walls.
Hard water plumbing damage is endemic in Chandler due to the high mineral content in the local water supply. Mineral deposits accelerate corrosion inside copper and galvanized supply lines, creating pinhole leaks that can drip inside walls for months before causing visible damage. These slow leaks create sustained, deeply-embedded moisture in wall framing and insulation that requires thorough moisture mapping to fully characterize.
Stucco exterior construction traps moisture effectively once it enters the wall assembly through cracks, failed caulk at windows, or roof edge failures during monsoon storms. The stucco exterior prevents the moisture from migrating outward, so it can only move inward through the building envelope, saturating framing, insulation, and interior drywall.
Monsoon storm events bring intense rainfall in very short time periods — Chandler regularly receives 1 to 2 inches of rain in under an hour during peak monsoon season. This sudden water volume overwhelms roofing drainage, enters through window and door frames that are designed for Arizona's typical near-zero rainfall, and can flood garage slabs, patios, and even interior floors before homeowners have time to respond.
Moisture Mapping for Slab Leaks
Slab leak moisture mapping is among the most technically demanding and highest-value applications of moisture mapping in Chandler. Because the water source is beneath the concrete slab and entirely hidden from view, moisture mapping is the only way to understand what has been affected and where.
When water leaks from a supply or drain line below the slab, it follows the path of least resistance upward through the concrete. Chandler's caliche soil — a dense, cemented calcium carbonate layer beneath the topsoil — prevents downward drainage, so slab leak water has only one direction to go: up. The water saturates the concrete from below, reaches the surface of the slab, and then migrates horizontally beneath the flooring adhesive and flooring panels above.
In a tile floor, the water enters grout lines and saturates the mortar bed, then the subfloor below the mortar. In hardwood or laminate flooring, it wicks under the flooring face and into the flooring panels, causing cupping, buckling, and delamination. In carpet, it saturates the carpet pad — which can hold enormous moisture volumes — while the carpet face remains only slightly damp to the touch.
Thermal imaging is particularly effective for slab leak moisture mapping. The water migrating through the slab typically creates a temperature differential of 2 to 5 degrees Fahrenheit between wet and dry flooring areas, which is clearly visible on a thermal scan. The resulting thermal image often reveals a bloom pattern radiating outward from the leak point — sometimes extending 10 to 15 feet in every direction from the actual pipe failure.
Moisture meter readings at the flooring surface and through flooring to the slab surface confirm the extent of saturation and provide the quantitative data needed for insurance documentation and demolition planning. Gateway Restoration's slab leak moisture mapping service includes precise documentation of all affected flooring areas, concrete moisture levels, and adjacent wall saturation, providing the complete picture needed for an accurate restoration scope.
Chandler's caliche soil layer prevents downward drainage from slab leaks, forcing all water upward through the slab into the flooring above. Additionally, Chandler's expansive clay soil in many neighborhoods absorbs moisture and swells, exerting lateral pressure on slab edges and plumbing lines — a contributing factor in the higher-than-average slab leak rates reported throughout the East Valley.
Moisture Mapping After Monsoon Flooding
Arizona's monsoon season runs from June through September and delivers some of the most intense short-duration rainfall events in North America. Chandler homes in low-lying areas, near washes, or with inadequate lot grading can experience rapid water intrusion that saturates flooring, drywall, and insulation before the storm has even fully passed.
Post-flood moisture mapping faces several unique challenges compared to typical plumbing leak scenarios. The water typically enters from multiple points simultaneously — under doors, through window weep holes, through wall cracks, and occasionally through roof penetrations during particularly severe storms. This multi-point entry creates a moisture distribution pattern that requires full-perimeter mapping rather than the zone-specific mapping used for localized plumbing leaks.
The water category in flood events is also typically higher than plumbing leaks. Water that has flowed across exterior ground surfaces picks up soil contaminants, organic material, and bacteria, classifying as Category 2 or Category 3 water under IICRC standards. This affects both the urgency of moisture mapping (Category 3 water requires immediate response) and the remediation protocols required once all moisture has been mapped and quantified.
Rapid moisture migration under flooring is the most critical finding in post-flood mapping. Flash flood water that enters a home at a half-inch depth can saturate the carpet pad and subfloor assembly across the entire room within minutes. When the visible water is mopped up, the home looks superficially clean — but moisture mapping reveals that the subfloor, base framing, and lower portion of all interior walls may be at 80 to 100% moisture content. Without professional monsoon flood moisture mapping, all of that hidden moisture creates a mold growth window that often closes before the homeowner realizes there is a problem.
Moisture Mapping and Mold Prevention
The connection between moisture mapping and mold prevention is direct: mold requires moisture to grow, and moisture mapping is the only reliable way to find all the moisture — including the hidden moisture that mold preferentially colonizes.
Mold does not require flooding to establish a colony. Studies consistently show that most common household mold species can begin colonizing porous building materials at relative humidity levels above 70% sustained over 24 to 48 hours. A wall cavity with trapped moisture at 80% RH — perfectly invisible to the naked eye — provides exactly the environment these organisms need.
The mechanism is straightforward: wet building materials release water vapor into the air in the enclosed space around them. In a sealed wall cavity, attic, or beneath-cabinet space, that vapor quickly brings the local relative humidity to near-saturation levels. Mold spores, which are naturally present on virtually every building material surface, activate when they encounter these conditions and begin the colonization process. Within days, a microscopic colony becomes a visible mold patch. Within weeks, it becomes a remediation project.
Moisture mapping prevents this by finding all wet materials before the mold colonization window closes. Once all moisture is identified and mapped, the drying plan targets every affected area with appropriately placed drying equipment. Structural drying removes the moisture that mold needs, and daily monitoring confirms that moisture levels are consistently declining toward the dry standard before the mold activation threshold is exceeded.
For properties where moisture mapping reveals pre-existing moisture conditions that suggest mold may already be present, a professional mold inspection is warranted as a follow-up to the moisture mapping process. The moisture map data identifies exactly where to focus the inspection, saving time and reducing the scope of potentially invasive investigation.
Moisture Mapping and Insurance Documentation
Professional moisture mapping produces the exact documentation that insurance adjusters require to understand the scope of a water damage loss and approve coverage for mitigation and restoration costs. This documentation includes:
- Initial moisture reports — floor plan diagrams with all moisture readings recorded at specific measurement points, dated and signed by the restoration technician, establishing the baseline moisture condition at the time of initial response
- Thermal images — date-stamped thermal photographs of affected areas showing the temperature anomalies that indicate hidden moisture, providing visual documentation that cannot be disputed
- Daily drying logs — sequential moisture readings from each measurement point across the full drying period, showing the progression from initial saturation to dry standard over the course of the restoration project
- Hygrometer records — ambient condition readings from each affected space throughout the drying process, documenting that appropriate drying conditions were maintained
- Final verification reports — a complete moisture mapping survey at project completion confirming that all areas have reached the established dry standard for each material type
Gateway Restoration is not an insurance company and does not provide insurance coverage. We assist property owners by documenting moisture conditions and restoration activities in the detailed format that insurance adjusters require to evaluate and process water damage claims. Our moisture reports, thermal imaging documentation, and daily drying logs are produced to IICRC standards and are widely accepted by insurance carriers throughout Arizona.
Common Moisture Mapping Myths
Myth: "If I can't see water, there's no problem."
Reality: The vast majority of significant water damage occurs in areas that look completely dry from the surface. Water migrates behind walls, under flooring, and into insulation through capillary action and gravity within hours of a leak event. Moisture mapping regularly finds extensive hidden moisture in homes where the homeowner was convinced the damage was minor and contained.
Myth: "Thermal cameras can see through walls."
Reality: Thermal cameras detect temperature differences at the surface of the material being scanned. They do not penetrate materials or directly detect water. A trained technician interprets thermal patterns as indicators of likely moisture and confirms with moisture meters. Thermal imaging without moisture meter verification is screening, not diagnostic confirmation.
Myth: "Arizona is too dry for hidden moisture to be a problem."
Reality: Arizona's dry outdoor climate does not help moisture that is trapped inside building materials. Wall cavities, subfloor assemblies, and insulation batt layers are thermally insulated from the exterior environment. A wet wall cavity in Chandler retains moisture just as persistently as one in a humid climate. In fact, Arizona's warm interior temperatures can accelerate mold growth even faster than cooler, more humid regions.
Myth: "One moisture reading is enough."
Reality: A single point moisture reading tells you the moisture content at one location at one moment in time. It cannot tell you whether moisture is present in adjacent materials, what direction moisture is migrating, or whether conditions are improving or worsening. Professional moisture mapping uses readings at standardized intervals across all affected areas and tracks those readings over multiple days to establish trends that guide the restoration process.
Myth: "Running fans is enough to dry things out."
Reality: Household fans move air across surfaces but cannot remove moisture from inside building materials where it is trapped. Even more critically, fans without dehumidification simply move moisture-laden air around the space, and the moisture resettles on adjacent surfaces. Professional structural drying uses calibrated air movers to accelerate evaporation from materials and dehumidifiers to capture that moisture from the air before it resettles — a fundamentally different and more effective process.
Real Chandler Water Damage Scenarios
Water Heater Leak in Ocotillo
Slab Leak in Sun Lakes
Appliance Leak in Cooper Commons
Roof Leak in Clemente Ranch
Monsoon Flood in Downtown Chandler
Why Moisture Mapping Saves Homeowners Money
Homeowners sometimes question whether professional moisture mapping is worth the cost. In virtually every case, the answer is yes — and by a significant margin. Here is why:
- Prevents mold remediation costs — mold remediation in Chandler typically costs $1,500 to $6,000 or more depending on the extent of growth. Finding and drying all hidden moisture before mold can develop costs a fraction of that amount.
- Avoids unnecessary demolition — without moisture mapping, restoration contractors either guess at the affected area (often missing hidden zones) or remove materials conservatively, sometimes demolishing materials that could have been saved with targeted drying. Moisture mapping defines the exact demolition scope, eliminating both under-demolition (leaving moisture behind) and over-demolition (removing unaffected materials unnecessarily).
- Accelerates drying — equipment placed based on moisture map data is targeted at the actual wet zones. Equipment placed without mapping is placed based on visible damage only, leaving hidden moisture unaddressed and extending drying time, equipment rental costs, and the risk of secondary damage.
- Improves insurance claim outcomes — the moisture map provides insurers with objective, documented evidence of the true scope of damage. Claims supported by professional moisture mapping documentation consistently achieve faster approval and more complete coverage than claims based on visual assessments alone.
- Reduces reconstruction costs — an accurate restoration scope based on moisture mapping data eliminates the costly surprises that occur when hidden damage is discovered mid-reconstruction. Contractors can plan and price accurately from the start.
When Should You Request Moisture Mapping?
Any of the following situations warrant professional moisture mapping:
- After any water damage event — pipe burst, appliance leak, toilet overflow, water heater failure
- After flooding — monsoon storm water intrusion, flash flood events, sewer backup
- After roof leaks — particularly leaks that have been active for more than 24 hours before detection
- When mold is suspected — musty odors, visible mold, or unexplained respiratory symptoms that may indicate hidden mold driven by hidden moisture
- During real estate transactions — pre-purchase moisture mapping can identify hidden water damage that visual inspections miss
- After plumbing repairs — confirming that a newly repaired slab leak or supply line has not left hidden moisture in adjacent materials
- When unexplained floor damage appears — cupping hardwood, buckled laminate, or tile grout cracks that may indicate below-floor moisture migration
- Following any monsoon event — particularly in homes near washes, with concrete block construction, or with known drainage grading issues
Why Chandler Homeowners Trust Gateway Restoration
Gateway Restoration has been responding to water damage across Chandler and the East Valley with the moisture mapping expertise and thermal imaging technology that Chandler homes require. Our approach to moisture mapping is built on IICRC S500 standards, genuine local knowledge of Chandler's construction types and soil conditions, and a commitment to honest, documented restoration work.
Our moisture mapping services include complete thermal imaging scans of all affected areas, pin and pinless moisture meter testing at standardized measurement intervals, hygrometer readings for ambient condition documentation, daily monitoring visits with logged drying progress readings, and final verification moisture mapping at project completion.
We pair moisture mapping with the structural drying equipment and commercial dehumidification capacity needed to address whatever the moisture map reveals. We do not just document hidden moisture — we dry it, verify the drying, and document everything for your insurance company.
Our crews respond throughout Chandler neighborhoods including Ocotillo, Sun Lakes, Cooper Commons, Fox Crossing, Clemente Ranch, and Downtown Chandler. We work near area landmarks including the Chandler Fashion Center, Tumbleweed Park, Veterans Oasis Park, and throughout the Arizona Avenue corridor and Price Corridor. When you call Gateway Restoration, you reach our local team — not an out-of-state call center routing you to an unknown subcontractor.
Frequently Asked Questions
Conclusion
Water damage is almost always larger than what homeowners can see. A burst pipe saturates a single wall and within hours has migrated under flooring, into adjacent rooms, and up through insulation in ways that are entirely invisible to the naked eye. A slab leak warms the tile surface while saturating the mortar bed, subfloor, and lower drywall throughout an entire room without creating a single visible wet spot. A monsoon flood leaves visible water on the floor but invisible moisture in the walls, beneath the cabinets, and throughout the subfloor assembly that extends far beyond the waterline homeowners can see.
Moisture mapping provides the data needed to find all of it — to locate hidden moisture wherever it has traveled, guide drying efforts to reach every affected area, prevent mold growth in the hidden zones where it thrives, and document the entire restoration process with the precision that insurance companies require.
If your Chandler home has experienced any water damage event, do not assume the problem is limited to what you can see. Call Gateway Restoration for immediate moisture mapping, thermal imaging, and structural drying services that address the full scope of the damage — including everything the naked eye cannot find.
Need Moisture Mapping in Chandler, AZ?
Hidden water damage does not wait. Gateway Restoration provides 24/7 emergency moisture mapping, thermal imaging, structural drying, and water damage restoration throughout Chandler and the East Valley. Call now for immediate dispatch.
17817 S McQueen Rd, Chandler, AZ 85286
📞 (480) 591-8997 — 24/7 Emergency Response
Moisture Mapping • Thermal Imaging • Structural Drying • Water Extraction • Mold Prevention
Serving Chandler, Gilbert, Mesa, Tempe, Queen Creek & Phoenix, AZ